BZU PAGES: Find Presentations, Reports, Student's Assignments and Daily Discussion; Bahauddin Zakariya University Multan Right Header

Register FAQ Community Calendar New Posts Navbar Right Corner
HOME BZU Mail Box Online Games Radio and TV Cricket All Albums
Go Back   BZU PAGES: Find Presentations, Reports, Student's Assignments and Daily Discussion; Bahauddin Zakariya University Multan > Welcome to all the Students > Tutorial

Tutorial Teach,Learn,Share,Discuss and Do everything other than Class Lectures


Reply
 
Thread Tools Search this Thread Rate Thread Display Modes
Old 25-11-2007, 01:50 PM   #1
AdobePhoto Shop Tutorial.. Free for my class fellows...
.BZU. .BZU. is offline 25-11-2007, 01:50 PM

We are Starting Adobe P.S. Tutorial today!

Placing a Graphic in your File
Often you'll want to import existing graphics and artwork into your Photoshop document. A problem for Photoshop? Not at all -- in fact, there are several ways you can do this!
External graphics can be placed in Photoshop as raster layers or Smart Objects. First, I'll show you how to place these graphics, then we'll talk about the difference between raster layers and Smart Objects.
Solution
Placing Artwork from a Web Page
Copy the artwork from the web page, then select Edit > Paste or press Ctrl-V (Command-V on a Mac) to paste it into your Photoshop document. Photoshop will create a new layer containing the artwork, or place it into a selected empty layer. The artwork will be on a raster layer.
Placing Artwork from Flattened Image Files
A flattened image file -- such as a GIF [4], JPEG [5] or PNG [6] -- contains artwork on a single layer. Open the file in Photoshop and use Select > All or press Ctrl-A (Command-A) to create a selection of the entire document. Click on your Photoshop document then select Edit > Paste or press Ctrl-V (Command-V) to paste it. Photoshop will paste the document into a new or selected empty layer as it does when pasting artwork from a web page. The artwork will be on a raster layer.
Placing Layers from a Different Photoshop Document
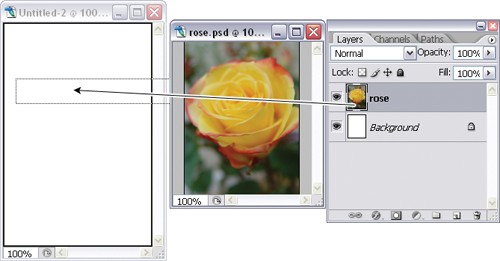
Position the document windows so that both are visible. Select the window of the document you wish to import from, to bring up its Layers palette. Select and drag the necessary layers over to the new window and release the mouse button when you see a thick, black outline around the window. This will copy the layers across as shown in the example at the top of the next page. The copied layers will retain their original properties.
Name:  dragdroplayertif.jpg
Views: 364
Size:  28.4 KB

Copying a layer from one Photoshop document to another
Placing Artwork from Illustrator
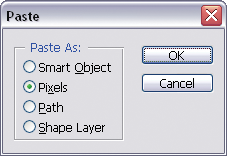
Open Illustrator and select the artwork you wish to export to Photoshop. Copy the artwork using Ctrl-C (Command-C on a Mac). Switch to Photoshop while Illustrator is still open and paste your copied artwork using Ctrl-V (Command-V). A dialog box will appear, asking you whether you wish to paste the artwork as a Smart Object, Pixels, Path or a Shape Layer.
Name:  pasteasdialog.png
Views: 349
Size:  24.3 KB

Paste dialog box
Placing Artwork as a Smart Object
Select File > Place and choose the file you wish to import. Click Place to import the file into your Photoshop document as a Smart Object. For PDF and Illustrator files, Photoshop will display a dialog box that asks you to select the pages you wish to place. Choose the pages you want and click OK.
Name:  boundingbox.png
Views: 388
Size:  28.6 KB

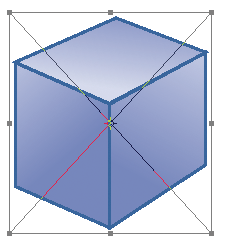
The bounding box for an image pasted as a Smart Object
The Smart Object will initially be placed with a bounding box surrounding it, as shown here. You can use this bounding box to move, rotate, scale, or make other transformations to the object. When you're done, double-click inside the bounding box to commit the Smart Object to its layer.

__________________
(¯`v´¯)
`*.¸.*`

¸.*´¸.*´¨) ¸.*´¨)
(¸.*´ (¸.
Bzu Forum

Don't cry because it's over, smile because it happened

 
.BZU.'s Avatar
.BZU.


Join Date: Sep 2007
Location: near Govt College of Science Multan Pakistan
Posts: 9,693
Contact Number: Removed
Program / Discipline: BSIT
Class Roll Number: 07-15
Views: 2179
Reply With Quote
  #2  
Old 25-11-2007, 02:04 PM
.BZU.'s Avatar


Join Date: Sep 2007
Location: near Govt College of Science Multan Pakistan
Posts: 9,693
Contact Number: Removed
Program / Discipline: BSIT
Class Roll Number: 07-15
.BZU. has a reputation beyond repute.BZU. has a reputation beyond repute.BZU. has a reputation beyond repute.BZU. has a reputation beyond repute.BZU. has a reputation beyond repute.BZU. has a reputation beyond repute.BZU. has a reputation beyond repute.BZU. has a reputation beyond repute.BZU. has a reputation beyond repute.BZU. has a reputation beyond repute.BZU. has a reputation beyond repute
Cool

Discussion
Smart Objects
A Smart Object is an embedded file that appears in its own layer in Photoshop. A Smart Object layer is distinguished by an icon that overlays the thumbnail image displayed in the Layers palette, as shown in the example below.
Smart Objects are different from other layers because they are linked to a source file (e.g., an Illustrator file, JPEG, GIF or other Photoshop file). If you make changes to the source file, the Smart Object layer will also be updated with those changes.
Name:  SmartObject_icon_sample.gif
Views: 346
Size:  35.5 KB

Raster layer vs Smart Object layer
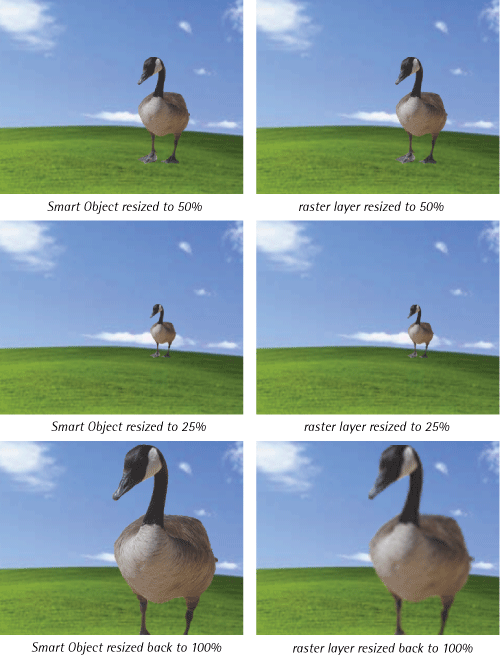
In contrast, raster layers (or regular layers) are fully editable, so you can draw and paint on them, fill them with colors, or erase pixels. Unlike Smart Objects, where you retain image quality, if you resize a raster layer smaller, you will lose information.
This is demonstrated in the example on the next page, which shows the result of a Smart Object that has been decreased in size, then resized back to its original dimensions. The same steps, when applied to a raster layer, produce an image that is blurred and of lower quality.
Name:  SmartObject_resizing.gif
Views: 335
Size:  132.7 KB

The difference in image quality when resizing a Smart Object compared to a raster layer
Because Smart Objects are linked to an outside document, you can resize them without losing the original image data. While you can apply layer effects and some transformations to Smart Object layers, you cannot actually manipulate (paint, draw, erase) their pixels because they are not editable from external documents. You can open the original source file for editing by double-clicking on the Smart Object icon
__________________
(¯`v´¯)
`*.¸.*`

¸.*´¸.*´¨) ¸.*´¨)
(¸.*´ (¸.
Bzu Forum

Don't cry because it's over, smile because it happened
Reply With Quote
  #3  
Old 25-11-2007, 02:09 PM
.BZU.'s Avatar


Join Date: Sep 2007
Location: near Govt College of Science Multan Pakistan
Posts: 9,693
Contact Number: Removed
Program / Discipline: BSIT
Class Roll Number: 07-15
.BZU. has a reputation beyond repute.BZU. has a reputation beyond repute.BZU. has a reputation beyond repute.BZU. has a reputation beyond repute.BZU. has a reputation beyond repute.BZU. has a reputation beyond repute.BZU. has a reputation beyond repute.BZU. has a reputation beyond repute.BZU. has a reputation beyond repute.BZU. has a reputation beyond repute.BZU. has a reputation beyond repute
Wink

Rasterizing
You can rasterize Smart Objects by right-clicking on the name of the Smart Object layer and choosing Rasterize Layer. This will break the link to the original source file and treat the layer as an ordinary raster layer.
Resizing a Document
Solution
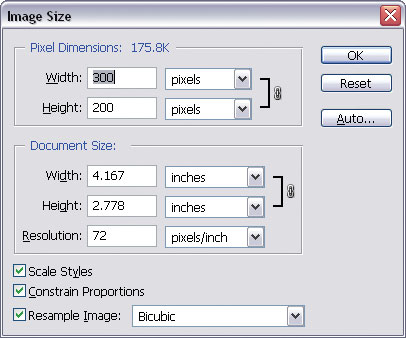
Bring up the Image Size dialog box by selecting Image > Image Size or pressing Ctrl-Alt-I (Command-Option-I on a mac). You can resize the document by altering either the Pixel Dimensions or the Document Size. Use the former when resizing images that will be used on screen (such as images that will be used on a web page), and the latter when resizing images that will be printed.
Name:  imagesizedialog.jpg
Views: 460
Size:  30.3 KB
Image Size dialog box
You can maintain the original document proportions as you resize the image by checking the Constrain Proportions checkbox. To scale layer styles (drop shadows, strokes, etc.), check the Scale Styles checkbox.
__________________
(¯`v´¯)
`*.¸.*`

¸.*´¸.*´¨) ¸.*´¨)
(¸.*´ (¸.
Bzu Forum

Don't cry because it's over, smile because it happened
Reply With Quote
  #4  
Old 25-11-2007, 02:12 PM
.BZU.'s Avatar


Join Date: Sep 2007
Location: near Govt College of Science Multan Pakistan
Posts: 9,693
Contact Number: Removed
Program / Discipline: BSIT
Class Roll Number: 07-15
.BZU. has a reputation beyond repute.BZU. has a reputation beyond repute.BZU. has a reputation beyond repute.BZU. has a reputation beyond repute.BZU. has a reputation beyond repute.BZU. has a reputation beyond repute.BZU. has a reputation beyond repute.BZU. has a reputation beyond repute.BZU. has a reputation beyond repute.BZU. has a reputation beyond repute.BZU. has a reputation beyond repute
Smile

Resizing a Layer or Selection
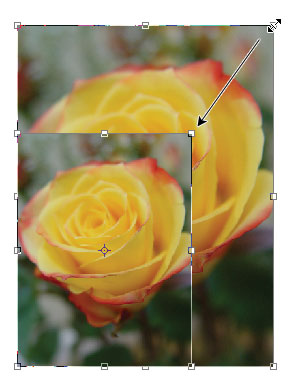
Photoshop also lets you resize layers or particular portions of a document without affecting the overall size of the document.
Name:  transform.jpg
Views: 329
Size:  22.1 KB
Resizing an element using corner handles
__________________
(¯`v´¯)
`*.¸.*`

¸.*´¸.*´¨) ¸.*´¨)
(¸.*´ (¸.
Bzu Forum

Don't cry because it's over, smile because it happened
Reply With Quote
  #5  
Old 25-11-2007, 02:19 PM
.BZU.'s Avatar


Join Date: Sep 2007
Location: near Govt College of Science Multan Pakistan
Posts: 9,693
Contact Number: Removed
Program / Discipline: BSIT
Class Roll Number: 07-15
.BZU. has a reputation beyond repute.BZU. has a reputation beyond repute.BZU. has a reputation beyond repute.BZU. has a reputation beyond repute.BZU. has a reputation beyond repute.BZU. has a reputation beyond repute.BZU. has a reputation beyond repute.BZU. has a reputation beyond repute.BZU. has a reputation beyond repute.BZU. has a reputation beyond repute.BZU. has a reputation beyond repute
Solution
From the Layers palette, select the layer that contains the element you wish to resize. If the layer contains other elements that you don't wish to resize, select your element using one of the selection tools.
After making your selection, use Edit > Free Transform or press Ctrl-T (Command-T on a Mac). A bounding box with handles will appear around your selection. Click and drag these handles to resize the element, as shown in this example. To keep the transformation in proportion so that the image does not appear squashed or stretched, hold down the Shift key and resize it using the corner handles.
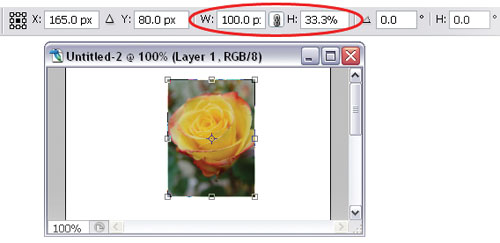
You can also resize the element to a specific width or height using the options bar. In the example below, I clicked the Maintain Aspect Ratio button (signified by chain links), then specified the width -- this changed the height of my element automatically. If I had not maintained the aspect ratio, only the width of my rose would have changed.
Press Enter or double-click inside the bounding box to apply the transformation
Name:  transformoptions.jpg
Views: 332
Size:  20.1 KB
Using the Free Transform options
__________________
(¯`v´¯)
`*.¸.*`

¸.*´¸.*´¨) ¸.*´¨)
(¸.*´ (¸.
Bzu Forum

Don't cry because it's over, smile because it happened
Reply With Quote
  #6  
Old 25-11-2007, 02:20 PM
.BZU.'s Avatar


Join Date: Sep 2007
Location: near Govt College of Science Multan Pakistan
Posts: 9,693
Contact Number: Removed
Program / Discipline: BSIT
Class Roll Number: 07-15
.BZU. has a reputation beyond repute.BZU. has a reputation beyond repute.BZU. has a reputation beyond repute.BZU. has a reputation beyond repute.BZU. has a reputation beyond repute.BZU. has a reputation beyond repute.BZU. has a reputation beyond repute.BZU. has a reputation beyond repute.BZU. has a reputation beyond repute.BZU. has a reputation beyond repute.BZU. has a reputation beyond repute
Default

Discussion
When you resize different layer types, you get different results. Vector shape layers, such as text or shape layers, can be resized larger or smaller without loss of quality.
Smart Objects can also be resized larger or smaller without loss of quality, depending on the original file. If the original file is a vector graphic, the Smart Object can be resized without ever losing quality. If the original file is a GIF or similar, the Smart Object can be resized up to the size of the image dimensions, above which it will start to lose quality.
Raster layers or selections can only be resized smaller. Resizing them larger will usually result in loss of quality.
__________________
(¯`v´¯)
`*.¸.*`

¸.*´¸.*´¨) ¸.*´¨)
(¸.*´ (¸.
Bzu Forum

Don't cry because it's over, smile because it happened
Reply With Quote
  #7  
Old 25-11-2007, 02:21 PM
.BZU.'s Avatar


Join Date: Sep 2007
Location: near Govt College of Science Multan Pakistan
Posts: 9,693
Contact Number: Removed
Program / Discipline: BSIT
Class Roll Number: 07-15
.BZU. has a reputation beyond repute.BZU. has a reputation beyond repute.BZU. has a reputation beyond repute.BZU. has a reputation beyond repute.BZU. has a reputation beyond repute.BZU. has a reputation beyond repute.BZU. has a reputation beyond repute.BZU. has a reputation beyond repute.BZU. has a reputation beyond repute.BZU. has a reputation beyond repute.BZU. has a reputation beyond repute
Default

Rotating a Layer or Selection
Earlier, you may have used the Free Transform command to resize layers and selections, and thought it was pretty swell. What you probably weren't aware of at the time is that the very same command can also be used to rotate layers and selections!
__________________
(¯`v´¯)
`*.¸.*`

¸.*´¸.*´¨) ¸.*´¨)
(¸.*´ (¸.
Bzu Forum

Don't cry because it's over, smile because it happened
Reply With Quote
  #8  
Old 25-11-2007, 02:21 PM
.BZU.'s Avatar


Join Date: Sep 2007
Location: near Govt College of Science Multan Pakistan
Posts: 9,693
Contact Number: Removed
Program / Discipline: BSIT
Class Roll Number: 07-15
.BZU. has a reputation beyond repute.BZU. has a reputation beyond repute.BZU. has a reputation beyond repute.BZU. has a reputation beyond repute.BZU. has a reputation beyond repute.BZU. has a reputation beyond repute.BZU. has a reputation beyond repute.BZU. has a reputation beyond repute.BZU. has a reputation beyond repute.BZU. has a reputation beyond repute.BZU. has a reputation beyond repute
Default

Solution
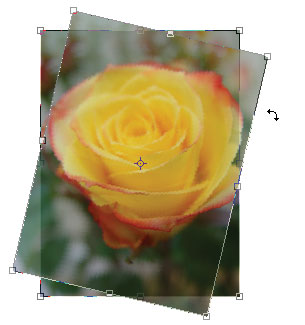
Make a selection or choose the layer you'd like to rotate. Select Edit > Free Transform or press Ctrl-T (Command T), and move your cursor outside the bounding box.
You'll see that it turns into a curved, two-headed arrow as shown in this example. You can click and drag this cursor to rotate the elements within the bounding box.
__________________
(¯`v´¯)
`*.¸.*`

¸.*´¸.*´¨) ¸.*´¨)
(¸.*´ (¸.
Bzu Forum

Don't cry because it's over, smile because it happened
Reply With Quote
  #9  
Old 25-11-2007, 02:23 PM
.BZU.'s Avatar


Join Date: Sep 2007
Location: near Govt College of Science Multan Pakistan
Posts: 9,693
Contact Number: Removed
Program / Discipline: BSIT
Class Roll Number: 07-15
.BZU. has a reputation beyond repute.BZU. has a reputation beyond repute.BZU. has a reputation beyond repute.BZU. has a reputation beyond repute.BZU. has a reputation beyond repute.BZU. has a reputation beyond repute.BZU. has a reputation beyond repute.BZU. has a reputation beyond repute.BZU. has a reputation beyond repute.BZU. has a reputation beyond repute.BZU. has a reputation beyond repute
Cool

Name:  rotate.jpg
Views: 339
Size:  16.9 KB
Rotating a selection
__________________
(¯`v´¯)
`*.¸.*`

¸.*´¸.*´¨) ¸.*´¨)
(¸.*´ (¸.
Bzu Forum

Don't cry because it's over, smile because it happened
Reply With Quote
  #10  
Old 25-11-2007, 02:25 PM
.BZU.'s Avatar


Join Date: Sep 2007
Location: near Govt College of Science Multan Pakistan
Posts: 9,693
Contact Number: Removed
Program / Discipline: BSIT
Class Roll Number: 07-15
.BZU. has a reputation beyond repute.BZU. has a reputation beyond repute.BZU. has a reputation beyond repute.BZU. has a reputation beyond repute.BZU. has a reputation beyond repute.BZU. has a reputation beyond repute.BZU. has a reputation beyond repute.BZU. has a reputation beyond repute.BZU. has a reputation beyond repute.BZU. has a reputation beyond repute.BZU. has a reputation beyond repute
Thumbs up

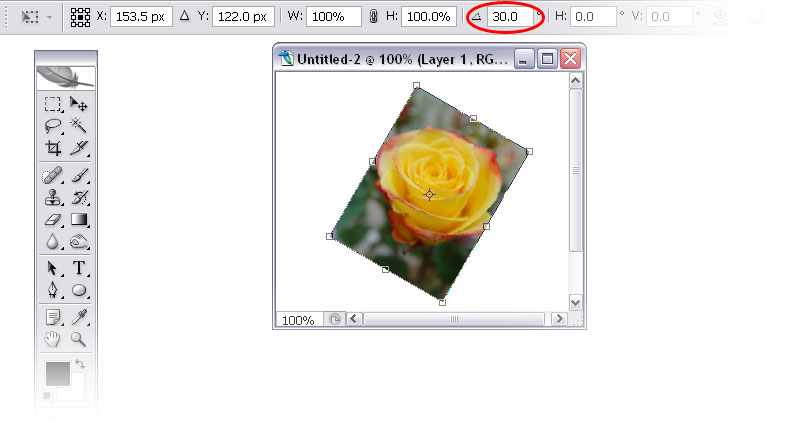
Hold down the Shift key to constrain the angle movement to 15-degree increments. You can also set a specific angle of rotation (between -180? and 180?) in the Angle text box in the options bar.
Name:  rotateoptions.jpg
Views: 343
Size:  40.4 KB
Setting the angle of rotation in the options bar
Rotation Alternatives
For 90- or 180-degree rotations, you can select Edit > Transform and choose from Rotate 180?, Rotate 90? CW, or Rotate 90? CCW.
Press Enter or double-click inside the bounding box to complete the transformation.
__________________
(¯`v´¯)
`*.¸.*`

¸.*´¸.*´¨) ¸.*´¨)
(¸.*´ (¸.
Bzu Forum

Don't cry because it's over, smile because it happened
Reply With Quote
Reply

Tags
adobephoto, class, fellows, free, photo shop, shop, tutorial


Currently Active Users Viewing This Thread: 1 (0 members and 1 guests)
 

Posting Rules
You may not post new threads
You may not post replies
You may not post attachments
You may not edit your posts

BB code is On
Smilies are On
[IMG] code is On
HTML code is Off
Trackbacks are On
Pingbacks are On
Refbacks are On


Similar Threads
Thread Thread Starter Forum Replies Last Post
Proposal of a 3th class boy to 9th class girl. usman_latif_ch Funny Cut Piece 0 02-11-2011 07:13 PM
New sub-domain, for free web development tutorial added .BZU. Suggestion,Feedback and News about site 0 01-07-2010 01:36 PM
Dedicated to my lovely friends and class fellows ghazala Urdu Poetry 1 18-06-2009 08:54 AM
Juniors [ Our New fellows.. shmsa Chit Chat 16 05-10-2008 10:22 PM

Best view in Firefox
Almuslimeen.info | BZU Multan | Dedicated server hosting
Note: All trademarks and copyrights held by respective owners. We will take action against any copyright violation if it is proved to us.

All times are GMT +5. The time now is 01:53 PM.
Powered by vBulletin® Version 3.8.2
Copyright ©2000 - 2024, Jelsoft Enterprises Ltd.