Solution
From the Layers palette, select the layer that contains the element you wish to resize. If the layer contains other elements that you don't wish to resize, select your element using one of the selection tools.
After making your selection, use Edit > Free Transform or press Ctrl-T (Command-T on a Mac). A bounding box with handles will appear around your selection. Click and drag these handles to resize the element, as shown in this example. To keep the transformation in proportion so that the image does not appear squashed or stretched, hold down the Shift key and resize it using the corner handles.
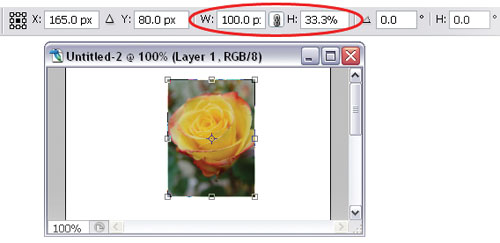
You can also resize the element to a specific width or height using the options bar. In the example below, I clicked the Maintain Aspect Ratio button (signified by chain links), then specified the width -- this changed the height of my element automatically. If I had not maintained the aspect ratio, only the width of my rose would have changed.
Press Enter or double-click inside the bounding box to apply the transformation
 Using the Free Transform options